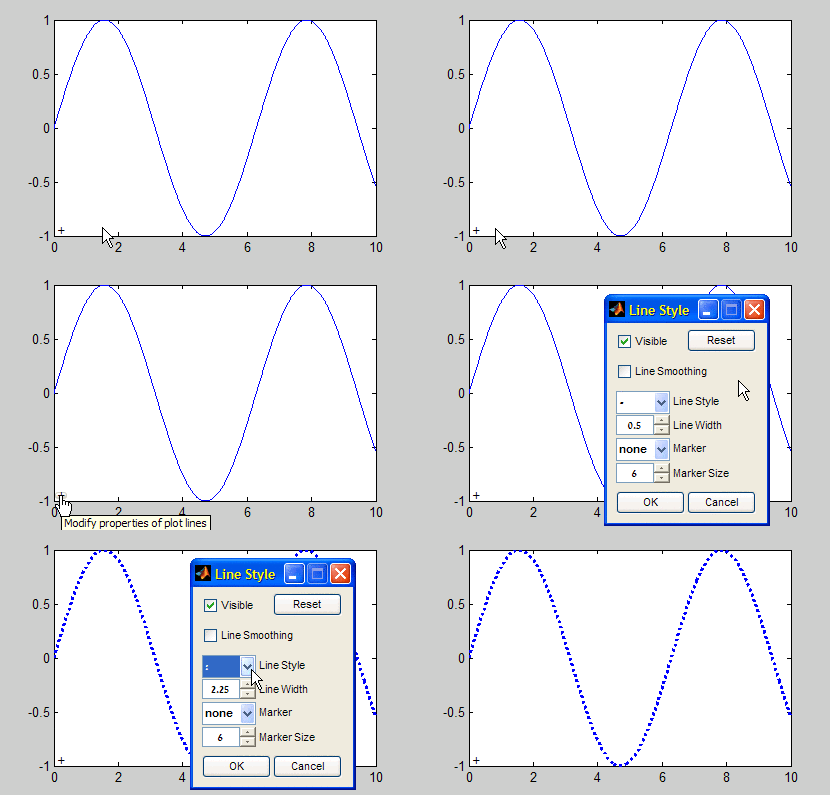
A couple of days ago, a reader of this blog has posted a comment asking for advise in enabling the user to dynamically set plot properties. While this can be done using the built-in inspect function, the reader correctly noted that this presents a list of numerous properties, most of which may not be very interesting for the casual user. So I wanted to use the opportunity to show an alternative mechanism that I have used in one of my applications and I think answers the need. It relies on a border-less button that is located right next to the plot axis origin, and when clicked, presents a simple plot line-style modification dialog window.
We start by creating a simple Java button (a com.mathworks.mwswing.MJButton in this case) with the simple text ‘+’. The benefit of using com.mathworks.mwswing.MJButton rather than the standard javax.swing.JButton, which MJButton extends, is that MJButton added a FlyOverAppearance property to the standard JButton. This is a very handy feature that enables to present a border-less button, except upon mouse hove, in which case a shadow border is displayed. This is exactly the effect used to highlight toolbar buttons upon mouse hover. To emphasize the button’s action, we set a HAND_CURSOR cursor whenever the mouse hovers over the button.
This button is then displayed onscreen using the built-in semi-documented javacomponent function, at the axes origin position. We set the button’s callback property to uisetlineprops, which was adapted from a File Exchange submission by the same name:
axesPos = get(hAxes,'pos');
btLinePropsCbStr = ['uisetlineprops(findall(' num2str(hAxes,99) ',''type'',''line''))'];
btLinePropsPos = [axesPos(1:2)+0.003,0.03,0.03];

% Note: all the following code is just to have a specific cursor
% ^^^^ (HAND_CURSOR) when hovering over the button...
btLineprops = com.mathworks.mwswing.MJButton('+');
btLineprops.setBorder([]);
btLineprops.setBackground(java.awt.Color.white);
btLineprops.setCursor(java.awt.Cursor(java.awt.Cursor.HAND_CURSOR));
btLineprops.setFlyOverAppearance(true);
btLineprops.setToolTipText('Modify properties of plot lines');
[dummy,btContainer] = javacomponent(btLineprops,[0 0 1 1],hFig); %#ok
set(btLineprops, 'ActionPerformedCallback',btLinePropsCbStr);
set(btContainer, 'Units','Norm', 'Position',btLinePropsPos);

A borderless button used to modify plot properties
The benefit of using this simple trick is that the ‘+’ button is unobtrusive, and yet highly accessible. Of course, similar button can be used for a wide variety of callback functionalities, limited only by your imagination!


 One thing with the modified code is that it is necessary to add an attachment to send an...
This looks very useful! Thank you.
Now, to figure out how to expand this to modify properties for several plots on one set of axes (but that’s the fun part).
Thanks Yair for sharing this feature. As you said the ‘+’ button is unobtrusive compared to any other uicontrol.
Looks like a very handy feature. Actually (being a newbie in matlab programming) I’ve some problems in setting your code snippet into a working code frame. How do I obtain hAxis and hFig ?
Thanks for giving more details …
Rudi
@Rudi – hFig is simply the Matlab handle for the containing figure, and hAxis is the handle of the relevant plot axis. These handles can be gotten via the gcf and gca functions respectively.
thanks. That helped!
So a working sample (on top of uisetlineprop) would be:
Is there anyway to set a uicontrol pushbutton to be borderless?
I like what you did, do you know how to do that using uicomponent(‘style’, ‘pushbotton’) instead of using a java button?
@Joel – customization of uicontrol buttons, including the issue of changing or removing the border, was discussed here.
Is there a way to do this same thing, nicely, for a 3D plot. What I want is one button on either end of the xAxis, such that when you press one of the buttons the xAxis limits change. (This would be one solution for zooming 3d graphs in the x-axis direction; since, the normal zoom function does not have proper properties for use in GUIs.)
Placing the buttons so that they stay in the correct position when rotating the 3D axis seems to be problematic, however. I have been trying to use viewmtx or the hidden properties such as x_ViewTransform in conjugation with the dsxy2figxy from the FEX, but the buttons still do not appear in the correct locations.
@James – I do not know any easy way to do it. You can place a property listener on the aforementioned axes properties, such that whenever these properties change, the invoked callback will update the button position accordingly.
Yes, that is what I was using. So, there is no hidden property or some easy way to get the figure pixel that corresponds to a point in a 3D axes? Or, more so, to get the pixel in the axes bounding box that corresponds to the 3d point? I think it should just be some affine transformation; however, I am unsure of where the axes bounding box lies in relation to the camera or the 3d axes. (I apologize for re-iterating the question; however, I saw that I never actually asked concisely in the previous post and want to be sure I was understood.)
@James – you can get the axes pixel positions via the properties described here. You should also take into consideration the DataAspectRatio and related properties, described here. Remember to ensure that the axes uses pixel Units, and also to take into account that the axes may possibly be a child of some figure container (e.g., uipanel, uitab etc.), which have their own pixel position vector. And yes – after you take all these into consideration the rest is just a simple affine transformation…
Pingback: Color selection components | Undocumented Matlab
Hello!
Thanks for your post. It is very helpful!
I don’t know the java language but I try to modify a button of my GUI (using GUIDE) to a borderless button. So I tried to use the setBorder function with [] to signify empty borders, but it is not working. I succeeded using the Fly Over Appearance in the create function of my button, like this:
But when I open my GUI, this one opens, then is hidden by Matlab and re-appears after. It seems to be a double opening on the screen.
Do you know why?
Mathieu G.
@Mathieu – try to run findjobj after your figure is made visible if you wish to avoid the flicker
Hi Yair,
What do you mean by Visible? I am a beginner with Guide; for me, the create function and then the opening function of the figure are called by Matlab when I run the gui with the Command Window. I try to add my lines (
variable = findjobj(findobj(gcf, 'Tag', 'bouton11'); variable.setFlyOverAppearance(true);) in these functions before your answer and also in the create function of the button but there is always this flicker.I feel i am not far from the solution but I have no more ideas.
I thank you in advance.
Ok I found the solution. It is just because I didn’t know the output function I discovered few seconds ago on another page of your wonderful website.
Thanks a lot for your work!
Another question if I can permit :
Is it possible to do button with round corner easily?